Coming Soon Coming Soon Coming Soon Hire a Coach Watch Live Streams
404 Error - page not found
We're sorry, but the page you are looking for doesn't exist.
You can go to the homepage

OUR LATEST POSTS

PVDDRnewgraphic1

Author: PVDDR - Twitter | TwitchTV

Hello!

It’s been a while since I’ve written anything here, so I’m going to reintroduce myself for those who didn’t read any of my previous articles. My name is Paulo Vitor, and I’m a professional Magic: the Gathering player who started playing Hearthstone a little over half a year ago. I have a long background in writing Magic articles, particularly those on general strategy, and I’ve decided that there are a few things I’d like to say about Hearthstone as well, so here I am. I hope you enjoy it!

In a game of Hearthstone, there are three important resources - Cards, Time and Life - and their importance changes from game to game. Being able to identify which of those resources is more important in a given game is perhaps the most valuable skill you can have, because this decision will be the foundation for all the other decisions you make that match.

Imagine the following scenario: you’re playing Shaman and it’s your turn two. You have the option of playing Haunted Creeper or to use your Hero Power. What do you do?

The right answer to this question, as it often is, is “depends”. In some spots, you’re going to play the minion; in others, you should use the hero power. But what does it depend on? It depends on which resource you value the most. If you value cards, then you should use the hero power, because it gives you an extra totem in the long run. if you value time or life, you should play the minion, because it’s going to give you a better early presence that will let you fight more easily over those. In today’s article, I’ll go over the three resources and how they relate to each other.

The Resources

Cards: Cards are the easiest resource to comprehend because they are what immediately comes to mind when we say “resource”. Cards are options. The more cards you have, the more different things you can do, the more choices you can make. A card doesn’t have to physically be a card - it could be, for example, a soldier from a Paladin hero power.

Time: Time is the resource that makes you able to use the other resource. When a player has five cards in their hand but can only play one before he dies, it is as if that player, effectively, only has one card; the other four, for all intents and purposes, do not exist. In Card games, the concept of time, action and reaction is usually defined by the word Tempo, which is the word I’ll use from now on. To “fall behind on tempo” means your opponent has the initiative, and is adding to his board while you are the one having to respond to it. In Hearthstone, being ahead on tempo will often translate to card advantage, so the two concepts will get blurry from time to time.

Life: I feel like life is the most misunderstood of the resources, because most people don’t even understand that it is a resource - but it is, and one that you can often trade for both tempo and cards. Having more cards and better tempo will gradually create an advantage that might spiral into a win, but having more life isn’t going to do that, so I like to think of it as a more spendable resource - its value is not in what it creates but in what I can trade it for. I like to equate life to the King in Chess - very minor, until there comes a point where it becomes the focal point of your game. Your first 29 points of life are basically meaningless, but the 30th means more than everything else combined.

The Interaction Between the Resources

Those resources interact in many ways, some of them quite obvious. Hero Powers, in particularly, are like Resource Markets, constantly providing the opportunity to trade one resource (usually tempo) for another. The Warlock hero power, for example, directly translates both life and tempo into cards, whereas the Warrior hero power directly translates tempo into life. Let’s see some more interactions:

Tempo and Cards

This goes back to the scenario I talked about before - the one where you’re playing Shaman and you have to decide your turn two play. In that scenario, you can choose a potential sequence of Haunted Creeper into Hero Power into Hero Power, or Hero Power into Hero Power into Hero Power + Haunted Creeper; option 2 gives you a better board in the end, gives you more cards, but it does so at the cost of a worse board presence in the beginning - tempo.

Every time you use your hero power when you could have done anything else, you’re giving up tempo. Most of the time you do so, it’ll be for cards. If you lead with a 2/1, I can play a 2/3 or I can use the Mage hero power on it; using the hero power doesn’t spend any cards, but it doesn’t add to my board either. Playing the 2/3 effectively uses two health from my creature the following turn, but culminates with me having a 2/1 in play when all is said and done.

A couple days ago, I was watching Kolento play a match of Priest versus Paladin. Kolento led with Wild Pyromancer, which was met with a 1/1 from the hero power. Then, on turn three, Kolento’s hand was Dark Cultist and Power Word:Shield, among others.

Most people would simply attack and play Dark Cultist. Kolento did not; he attacked the Soldier, and then used his hero power to heal back the Wild Pyromancer into a 3/2. Kolento did this because he didn’t want to expose his Pyromancer to a potential Muster for Battle. This comes at a great cost for him, because if his opponent does not have Muster for Battle (or does not wish to play it), then Kolento will have basically wasted his third turn. At the very least, he wasted three damage. Yet he still did it, because he recognized that the most important resource in the matchup in question was not life or tempo, but cards. He would rather do nothing on his turn three than potentially lose a card for free. If you don’t understand which resource matters more, you never make that play. The end result was that his opponent did play Muster for Battle (an arguable decision in itself, facing a Pyromacer, but that’s neither here nor there) and Kolento was able to clear the board with his Power Word: Shield, keeping his Pyromancer alive through all of it.

When you make the decision to spend a card rather than using a hero power, you’re doing the opposite. You do this because you believe that adding to the board is more important than having more cards at a later time.

Imagine I’m playing Mage and you lead with a 2/2. Now I have the option to Hero Power it twice, or to play my own 2/2, which spends a card but deals with the problem immediately. If I think that I’ll fall behind too much - that tempo is important in this match - then I will just play my 2/2 and trade, which will let me play something on turn three instead of having to Hero Power again.

Tempo and Life

The trade-off between Tempo and Life is the hardest to master because, if you get it wrong, it’s very punishing. It’s also very rewarding if you get it right, because you trade what is usually a less valuable resource for a more valuable one.

Weapons are great ways to turn your own life total into a different resource - both tempo and cards. When I use Fiery-War Axe to deal with your first minion, I am losing life points to kill two of your cards and to advance my position ahead of yours (because I can kill the next guy you play for free and then I’ll be ahead on tempo). Weapons work very well with the Warrior hero power, for example, because they give you an outlet for all this extra life that you get.

Another way to trade Life for Tempo is to simply wait to play a spell. If I have a Hellfire and all you have is two 2/3s, I might just take some hits from them without pulling the trigger. As long as I do not play Hellfire, you will be unwilling to commit more to the board next turn, which will essentially prolong the game. If I do not play Hellfire here, I am stating “I understand that I’m taking four damage this turn and I am perfectly ok with that, because advancing the game by a turn at the cost of four life is worth it to me”.

Tempo is not just about having more time, however; it’s also about having better timing and doing things at a time where they’re more convenient for you. Part of the life/tempo relationship is also about giving up life points so that you can time things in a way that leave you at the best possible position. I’ll explain:

Imagine you’re playing Paladin and your hand is Consecration, Equality and Tirion. You have six mana and 30 life, and your opponent has three 4/5 minions. In this spot, playing Consecration + Equality is clearly good - you are just going to die to those guys if you don’t do something about it. However, it will put you in a bad spot, because your opponent will follow it up with something and you will have no immediate response. They will basically get a free turn.

Now, imagine that you wait a turn. There are two advantages for that: first, your opponent might think you logically don’t have Consecration + Equality (or you would have played it) and commit more to the board. If he does that, you’ll have traded cards for life - you’ll take 12 more damage, but you’ll deal with another card from your opponent, which might just be more important. Second, it puts you in a better position for the follow-up; your opponent will have a turn to play something, but then you can immediately match it with a Tirion. In the end, you essentially removed a “free turn” from them at the cost of 12 life. Is that worth it? It might be.

Another example would be when your opponent leads with, say, a 1/1 Paladin token and you have a Mortal Coil. You can Mortal Coil it immediately, but then you can’t use your own Hero Power; it’s much better to use the Hero Power this turn, take a hit from the soldier, and then use Hero Power + Mortal Coil next turn. In this spot, you’re timing things so that they work out for you - so that you don’t have a mana left on turn three. You’re trading life for tempo, and that tempo will translate into cards (since you’re using it to activate your hero power).

You also see this happening a lot in Warrior decks that play Shield Block. A lot of the time, people will Shield Block when they have four mana, for the immediate 5 Armor gain. More than that - they will also get the chance to play whichever card they drew a turn sooner, and they won’t need to spend 3 mana on Shield Block ever again. If you care more about life than about tempo, however, then it’s correct to simply Hero Power on the turn where you have four spare mana, and then do Hero Power + Shield Block on a future turn; it is slower, but ends up giving you two extra life in the long run, at the cost of three mana which you will have to pay at any point you want to play Shield Block.

Cards and Life

The most usual ways to trade life for cards are Weapons and the Warlock hero power, but, much like with Tempo, you can also do this by waiting. Imagine, for example, they have a decent board that includes Harvest Golem. I have an Auchenai Soulpriest and Circle of Healing, and 5 mana. If I pull the trigger here, that means I care about my life total more than I care about cards; you’ll get a 2/1 Damaged Golem and likely kill my Auchenai. If I wait a turn, I’ll take an extra hit, but then I can kill the Golem with the Hero Power, which will lead to keeping the Auchenai in play; I get a card, in exchange for life.

Sometimes, however, life is more important than cards. If you play a 3/2 and I have the option of either using the Warlock hero power or playing Darkbomb, I might want to play Darkbomb; I’ll give up a card, but I’ll take less damage (and be even on tempo). Sometimes, you have the option of using the Warlock hero power, and instead you do nothing, because you don’t want to trade two life for a card to begin with.

In matches where life is particularly important, you also don’t want to use your weapons a lot of the time; if we both have 3/3s and I have a Fiery-War Axe, it’s feasible that I want to just trade minions instead of taking three damage. In this spot, I’m prioritizing life over all other resources.

Choosing a Resource to Prioritize

Now that we know how to trade resources, how do we decide which one is the most important?

The importance of each resource is going to vary from game to game based on what class you’re playing, what class they’re playing, your opening hand, the composition of each deck, and what has happened in the match so far. There’s no way to know for sure which resource should be prioritized, but a general guideline you can often use is the style of decks that are being played:

Slow Control versus Slow Control - the defining resource is Cards.

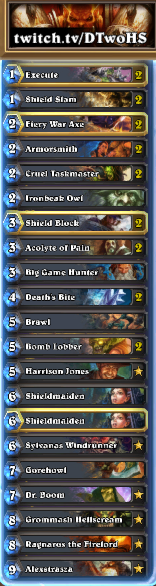
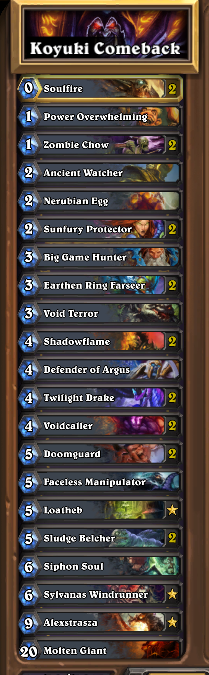
Slow control decks are the ones that are, well, slow - decks that have enough power in them to win the game through whatever the opponent is doing. They don’t need to snowball an advantage, because they’re going to play Legendaries from turns 6 to 10. Handlock, Control Warrior, Paladin and Control priest are examples of that.

Control decks are generally built in a way that enables them to at least try to survive good starts from the aggressive decks. If that is the case, then another control deck usually has no hope to win by early pressure, even if they manage to have a particularly aggressive draw. Simply put, there are more early answers than early threats in those decks, and everything you try to do early will be met with a swift response. You do not win those matches by being faster, you win by having more stuff going on. The game is a succession of powerful things being answered by more powerful things, and whoever has the last powerful thing standing usually wins.

In those matchups, tempo and life matter very little, and cards matter a lot. I would recommend that you go out of your way to gain an advantage in cards - such as, for example, using the Paladin hero power instead of playing a two mana minion. If you do this a couple times, you will force them to spend real cards on your “fake cards” and that’s a win for you.

Control versus Board decks - The defining resource is Tempo

Board decks are the decks that try to win by having a superior board and snowball that into an advantage; they can be very early-game oriented (Zoo) or not so much (Undertaker Priest, some Druid versions, most Mech decks). Those decks live or die by their ability to have a superior board presence; if I pass turn three against a Zoo deck and I have a minion when they have an empty board, I feel like I can never lose.

When you play with or against those decks, it’s often correct to make sacrifices in both cards and life so that you stay ahead on tempo. This means you should play your minion instead of using your Hero Power, and you should often attack their minions instead of attacking them. If you can survive to the late game without being buried by a superior board presence, then you should naturally win, because your cards are more powerful. When I’m playing Handlock against a more aggressive deck, for example, I’ll be very glad to play a turn three Earthen Ring Farseer just so I can fight their board a little bit, whereas if I’m playing against another control deck I might use the Hero Power instead.

Board decks versus Board decks - The defining resource is Tempo, and then Cards

Board versus Board is the most snowbally of all the Hearthstone matchups, because, once someone falls behind, it’s extremely hard to make up for it. In those matchups, you should really make sacrifices to not fall behind on tempo, because both decks operate with the assumption that they will be ahead in this resource.

The difference between this and the Control versus Board matchup is that there is no one that wins by default if there isn’t a tempo advantage. If both players match each other’s tempo and no one can gain a clear advantage (i.e. no one can pass the turn with a board that cannot be answered on your opponents turn), then the defining resource starts being cards; you will no longer win on speed, you will win by having the last threat standing. In a matchup like this, it’s very important to recognize when the resource shifts from tempo to cards - if you start feeling like a snowball is not going to be possible, you must adapt your way of thinking.

Control versus Face Aggro decks - The defining resource is Life.

“Face aggro” decks, for a lack of a better name, are the aggressive decks that try to win by dealing damage, rather than by controlling the board - examples would be Hunter, Aggro Rogue, or anything with “cancer” in the name. Those decks don’t particularly care about having a better board position and will frequently win games in which they appear to be very far behind.

When those decks are usually involved in a match, the resource to watch for is life. You will often find yourself at a spot where you have total control of the game, but you have to hope their last card isn’t Kill Command, or Eviscerate, or Fireball - and it usually is, because they’re the luckiest (and also because anything else they would have already played so their last card basically has to be that). You need to avoid getting in this spot, and that means making both tempo and card sacrifices in favor of life, including attacking with a minion rather than with a weapon, and simply not using the Warlock hero power despite having two open mana. When I’m playing Handlock versus Hunter, I’ll almost always play a turn two Sunfury Protector just so I can attack their minions and save some life early on, for example.

Face Aggro versus Face Aggro and Board Decks versus Face Aggro - The defining resource is Tempo, then Life.

Both of those matchups play similarly. In both of them, it’s possible to snowball an advantage so greatly that they can never threaten your life total, in which case you win by default no matter which side you are on. If this doesn’t happen, however, then life becomes the main resource, and it becomes a race to see who can kill the other person. At this point, it’s often correct to ignore the board altogether and to go for the face.

You will often see this change quite clearly in Hunter mirrors. In the early game, people will play Eaglehorn Bow and gladly attack an opposing minion. In the late game, however, it’s much more common that Eaglehorn Bow attacks the player - because you are trying to race and you want to deal three damage more than you want to get rid of their minion.

Changing the Important Resource

We saw before that it was possible for the important resource to change in the middle of a match. This is something that will happen naturally, but also something that you can - and should - force when the battle for the current resource is not going in your favor.

One of my favorite quotes comes from the TV show “Mad Men”, in which the main character says “If you don’t like what they’re saying, change the conversation”. In a game of Hearthstone, it’s similar - if you don’t like what’s happening, change the focus of the game. If you feel like you cannot win a battle for a particular resource, then try to sculpt the game in a way that this resource is no longer relevant.

You can see this a lot in Heathstone because you’re able to attack minions and you’re able to attack their life total directly. There are moments in which people suddenly stop attacking one and start attacking the other, and that’s usually the moment they realize “whoa, this is getting too hard here. But maybe I can just attack and kill him instead?”. It should always be on your mind that, if you’re losing a battle for a resource, you can try to make that particular battle not matter.

Being able to change which resource is important is a big part of the reason why some slower decks run “combo kills” - things like Gromosh, or Force of Nature + Savage Roar, or even the warrior one-turn-kill combination with Worgen and Battle Rage. Having those cards in your deck lets you change the game so that life becomes the key resource, and that’s a very powerful option to have. There have been many games in which I managed to get to an overwhelming board position against Warrior, only to be killed by Gromosh + Death’s Bite - I was ahead on cards, the resource that is usually the most important, but my opponent managed to change the focus of the game to life, a fight he could actually win.

This is also, incidentally, why I never liked the Leeroy kill in Handlock very much. You see, Handlock will always win on cards. Ok, always is a stretch, but it will almost always win on cards, since it has more card drawing and better cards to draw than anyone else. As such, it has very little reason to try to change the focus of the fight to anything else.

People who play against Handlock, on the other hand, should know that they are probably not winning a battle for cards. They should know from the beginning that their goal is to change the focus of the fight. If I’m playing Priest or Druid versus Handlock, for example, I know that, if I don’t apply at least some pressure, I will very likely lose - so I have to go for it, even if that’s not what my deck usually does best, because I certainly do it better than they can.

In the end, there isn’t an easy way to know what to do, no one-size-fits-all, since most of it comes from experience. I hope I was able to provide some guidelines, however, so that your own thought process becomes a little easier from now on.

That’s what I got for today! I hope you enjoyed it, and feel free to give me any feedback or any suggestions you have, on this article or on future articles. I can be reached on twitter at @pvddr or on my stream at twitch.tv/pvddr.

Thanks a lot for reading, see you next time!

PV

Team IHEARTHU: Twitter | Website

Sponsored by: Kinguin | Waypoint Media

Here’s Team IHEARTHU’s weekly Meta ranking. Keep in mind, it’s about which classes and archetypes are played the most, not about which are the strongest. Most of the time, the strongest decks will also be the most frequently played, but that’s not always the case. That’s just part of how the Meta works.

Warlock: Warlock will always continue to be one of the ladder’s most popular classes as long as it remains the only class with access to multiple, distinct archetypes. Both Zoo and Handlock have been performing admirably in tournaments and on the ladder recently. Darkwonyx even piloted a build of Demonlock to a victory in the ESL Legendary series this past week. Expect to see copies of his deck on the ladder as well as the usual Zoo and Handlock culprits. Don’t be caught off guard by a Fel Cannon!

Warrior: Warrior hasn’t changed much from recent weeks and remains one of the game’s most consistent decks. This consistency has made it a staple in nearly every tournament line-up. The deck has few truly poor match-ups, and has enough removal and life gain to pull its way out of any situation. Most builds of Control Warrior are incredibly similar and vary only with a few tech cards such as Gorehowl, Explosive Sheep, and Faceless Manipulator. Brawl had been seeing frequent exclusion from the deck, but is once more trending as a one-of. Note that many players running Explosive Sheep have cut one Cruel Taskmaster.

Paladin: Paladin hasn’t lost any momentum and remains one of Hearthstone’s premier competitive decks. The deck was a key component of IHEARTHU Faramir’s strategy in recent tournaments and secured him a win in both Heroes of Cards 4 and Tavern Takeover 3. The popular midrange Paladin brew boasted an impressive 7-1 record in Faramir’s Tavern Takeover run. Midrange Paladin has significant room for personal tech, so expect to face multiple variants on the ladder. IHEARTHU’s build will likely be one of the more popular versions you’ll encounter due to its recent success. Zombie Chow in particular gives this version a distinct edge in the mirror and against aggressive strategies. The Divine Shield variant popularized by Strifecro also sees a reasonable amount of play. If possible, be sure to play around Quartermaster and Blood Knight.

Hunter: Hunter has begun to creep its way into the upper echelons of competitive ladder play. While the deck is frequently a subpar choice in tournaments due to the popularity of Warrior and Paladin, Hunter can still succeed on the ladder due to the much more varied array of classes you will face. A strong build of Hunter with a good opener can still blitz its way through some of Warrior’s strongest starts. While this won’t happen frequently, it will happen often enough to get by on the ladder. Most current builds of Hunter are very reminiscent of pre-GvG midrange Hunter builds. They typically run a suite of three traps, both Savanah Highmanes, Loatheb, and frequently another heavy hitting five drop. Sludge Belcher has been especially popular in the deck as of late. Dr. Boom has also snuck his way into many builds of Hunter. While typically not relevant, it’s noteworthy that Dr. Boom’s Boom Bots proc Undertaker twice.

Mage: Mage has fallen off a bit in popularity since its success two weeks ago, but remains the most relevant mech class. Mech Mage has proven itself a standby of the new meta, largely on the back of Goblin Blastmage. Most builds are very similar, with the only difference being whether they run Dr. Boom or Archmage Antonidas. Secret Mage is still a powerful and relevant deck, but sees significantly less play than Mech Mage. If you do run into Secret Mage on the ladder, expect Mirror Entity and Duplicate.

Druid: While not moving in relative position on our rankings, Druid has seen marginally more ladder play this week than last. This is largely due to its strong Warrior match-up and general proactive nature. While some players are using Ramp Druid, Fast Druid is vastly more popular. Be sure to play around the Force of Nature/Savage Roar combo whenever possible.

Priest: Priest has struggled to solidify its identity post-GvG. Control Priest isn’t quite as well positioned as it used to be and Deathrattle Priest hasn’t been particularly popular for a while. The class has mostly stayed afloat due to its fan-favorite nature and on the sheer hype surrounding powerful GvG class cards Shrinkmeister and Vol’jin. Expect to face Control Priest when laddering. Lightbomb has begun to trend some, so be sure to play around it when reasonable.

Rogue: Miracle Rogue has gained some headway, but still sees relatively less play than most other classes. Expect Miracle Rogue opponents to rely on Alexstrasza to set up the finishing blow. Sabotage is often played as a one-of and Tinker’s Sharpsword Oil usually sees plays as well. Tinker’s Sharpsword Oil also frequently sees play in Tempo Rogue decks. The new GvG cards are proving to be powerful tools for Rogue. Expect Rogue to become more popular in the coming Meta Report #49 - dotwweeks.

Shaman: It’s telling of how diverse and powerful the meta is when a class like Shaman falls to the bottom of the ranks. Shaman is still a very strong class with top tier tools, however, its match-ups don’t line-up particularly well against the current most popular decks. It’s likely Shaman only needs a little tinkering before being a top tier contender. Don’t be surprised if Shaman spikes in power or popularity as players experiment with different ways to build the class or the volatile meta softens to Shaman.

Deck of the Week – IHEARTHU Handlock

There’s nothing quite like playing an 8/8 giant on turn four. Handlock has long been one of Hearthstone’s top competitive decks, and it doesn’t look like that’s changing with GvG. This particular build of Handlock was created by IHEARTHU team members and piloted to significant success in recent tournaments. It eschews the defensiveness of Defender of Argus and Sludge Belcher in order to maximize its AOE and threat density. Hellfire is an especially strong spell in the current meta. Paladin’s strongest move is to make a swarm of 3/3s with Quartermaster and most mechs do not have more than three health. Hellfire is the perfect answer to many of the game’s current strategies which rely heavily on board presence. Sylvanas Windrunner, Dr. Boom, and Ragnaros the Firelord ensure you can drop the most powerful threats every turn of the game. Antique Healbot is the glue that holds the deck together. The immense eight light gain allows you to get away with cutting most of the deck’s ability to taunt, and focus on a much more proactive game plan.

t3

A look at Faramir’s run to the Tavern Takeover 3 Championship

When the brackets were released for PvP’s third edition of the Tavern Takeover, not many outside of Team IHearthU gave Faramir much of a chance at winning the event. Stuck in the same quarter as Kolento, Strifecro, and Neirea, just getting to the latter stages of the tournament would be difficult. But behind solid preparation and even-keeled play, he was able to put on one of the more impressive tournament performances in recent memory. Let’s take a look at how he was able to do it:

The Decks:

Because Tavern Takeover featured a non-ban format, it was crucial to have three solid decks heading into any particular matchup. Instead of relying on specific counters, we felt it was best to choose decks that stood a chance against a wide variety of classes and archetypes. Thus, Midrange Paladin, Control Warrior, and Handlock Warlock were chosen, having been among the most consistently well-performing decks, both in tournaments and on the ladder.

The Paladin that Faramir ran was one card off of the deck that propelled teammate Powder to #1 on the European server. It has a variety of tools to deal with aggressive decks like Zoo Warlock and Hunter, while having enough punch to defeat more control-oriented decks like Priest. Though it’s an underdog versus Warrior and Handlock, those matchups are far from unwinnable.

Control Warrior, with the addition of cards like Shieldmaiden and Dr. Boom, has seen its win percentage increase across all matchups. Previously disastrous matchups like Zoo and Druid are much more reasonable, while rushdown decks like Hunter have become a walk in the park. The Warrior we brought was as standard as it gets, with copies of Whirlwind and Brawl to help ward off the Paladin decks bound to be seen in the tournament.

The Handlock that Faramir played was the most unusual deck of the three. Innovated by teammate Impact and refined by the rest of the team, the deck only ran two sources of taunt in its Sunfury Protectors. Defenders of Argus and Sludge Belchers were given up in favor of more healing, board clears, and big Legendaries. Against aggressive decks, the plan was to wipe the opponent’s board with one of its four board clears, then stabilize the health total via one of its seven heals. Against more control-oriented decks, the inclusion of Sylvanas, Dr. Boom, Ragnaros and Jaraxxus on top of the traditional threats gave it lasting power.

Round 1: Kolento

Faramir’s run started with Kolento, one of the most highly-regarded professionals in the world. Not knowing his opponent’s lineup, Faramir opened with Paladin, as it has relatively few weak matchups. Kolento smartly opened with Warrior, perhaps reasoning that Faramir was unlikely to run Zoo or Druid. After two tense, highly-contested games, Faramir found himself down, 0-2, with only our new Handlock to fall back on. A back-and-forth game finally stabilized in Faramir’s favor after a timely Antique Healbot staved off lethal from Grommash Hellscream. Kolento went with a very control-oriented Mage in the next game, which was either a mistake or an attempt to gather more information on Faramir’s deck. In any case, Faramir easily took the victory behind the mountain of heals the deck provides. Kolento unexpectedly played Zoolock in the final match, and after narrowly holding off the Ukrainian player’s aggression, Faramir’s deck worked as intended with its board-clear spells and heals saving the day.

Round 2: Strifecro

Faramir’s reward for defeating Kolento was facing Strifecro, Kolento’s teammate and another well-respected professional. This time, both players were aware of their opponent’s composition, as each of their first-round matches went the full five games. Because his Paladin deck didn’t counter any of Strifecro’s decks (and thus would not be picked over either of the other two after a game 1 loss), opening Paladin was a sensible choice. Strifecro opened Handlock, but a series of unfortunate draws and consistent pressure from Faramir gave him the 1-0 lead. Falling back on his Mage deck, Strifecro had a plethora of answers but couldn’t wrestle the tempo advantage away from Faramir, who took a 2-0 lead. Knowing firsthand the comeback potential of Warrior from previous matches, Faramir put on the pressure early in game 3 and was able to once again tempo Strifecro out of the game, resulting in a 3-0 sweep.

Semifinals: Dart

Running the same trio of classes as Faramir’s previous opponents, Dart was able to push his way through the qualifiers all the way to the semifinals. Though a Paladin opening from Faramir was predictable, it was still the correct choice, as it would face an unfavorable matchup no matter when it was played. Dart opened with Handlock and seemed to have the advantage before a crucial misplay gifted Faramir a free Mountain Giant via Faramir’s Sylvanas. Up, 1-0, Faramir again went with early pressure to try to snatch up game 2 early. With a stacked hand but barely any removal, Dart fell quickly to the onslaught and found himself in the unenviable position of trying to reverse all-kill with Mage. Game 3 was an absolute thriller, as Faramir went from putting on pressure, to pulling back with Lay on Hands, to making a final push through two Molten Giants and a Ragnaros. Faramir engineered a Ragnaros steal with his Sylvanas in the waning moments of the game, and it proved fruitful when Ragnaros hit Dart’s face to close out the series.

Finals: Backspace

Faramir found himself in another somewhat unexpected matchup in the finals when he faced new Team Archon recruit, Backspace. Against a lineup of Paladin, Zoolock, and Warrior, Faramir opened with Handlock, since it had a strong matchup against all three deck archetypes. Put on the backfoot to some early pressure, Faramir slowly wrestled board control away, putting the game away with the huge threats Handlock provides. Though Warrior’s odds against Handlock have improved with the release of GvG, game 2 was a one-sided affair, with Backspace running out of ways to remove Faramir’s seemingly never-ending threats. Game 3 versus Zoolock found Faramir with all the right answers, suffocating Backspace out of the game after Faramir taunted his two Molten Giants. Able to revive a deck in the finals, Backspace opted for Warrior. This time, Faramir was unable to draw enough taunts and healing to ward off Backspace and Grommash ended the game, giving Faramir his first loss in three rounds. In game 5, Faramir opted for his trusty Paladin and went with the same strategy of pressuring his opponent into submission. With a full hand but insufficient removal, Backspace fell, improving Faramir’s Paladin to 7-0 in the tournament.

Final Thoughts

It takes a lot of hard work and good fortune to make it through such a stacked field of players. Through thorough preparation and very solid play, Faramir came through with the victory for himself and team IHearthU. We look forward to Faramir’s continued success and hope you enjoyed this look at his run to the championship.

dtwowarrior11

Team IHEARTHU: Twitter | Website

Sponsored by: Kinguin | Waypoint Media

Introduction:postgvddtwowarrior

Many players have put their own Goblins vs Gnomes spin on Control Warrior, and this is team IHearthU’s version. Though there are a few modifications, many of the staples - life gain, card draw, fat late-game Legendaries - remain the same. Therefore, the deck plays out much like the old Control Warrior, though we believe the GvG additions we’ve made have significantly improved the deck. Let’s take a look:

Iconic Cards

Since the release of Naxxramus, almost every Control Warrior has run two copies of Execute, Shield Slam, Armorsmith, Cruel Taskmaster, Acolyte of Pain, Shield Block, and Death’s Bite, along with a copy of the Legendaries Sylvanas Windrunner, Grommash Hellscream, Ragnaros the Firelord, and Alexstrasza. The weapons help the Warrior survive the early game, the little guys provide armor and card draw while being annoying, and the big guys help you overpower in most matchups provided you can survive to that point.

The GvG cards we’ve put in the deck are Bomb Lobber, Shieldmaiden, and Dr. Boom. Though it’s only five cards, they significantly change the way Warrior is played. Whereas Sludge Belcher was a completely defensive card, Bomb Lobber helps to proactively take out the opposing minions. Since Warrior likes to use its removal to keep the opponent’s board size small anyway, Bomb Lobber will usually hit the target you want it to hit. Shieldmaiden can hold off aggressive decks and buy you some time while also putting a reasonably-sized minion on the table. In my experience playing with and against Shieldmaiden, it is a surprisingly difficult minion to deal with, particularly knowing that there are bigger minions coming down the line. Finally, Dr. Boom was added as a way to both provide a threat and to help deal with multiple opposing minions. And considering the other minions in the deck, Dr. Boom’s seven attack isn’t nearly as much of a drawback as in other decks.

Ironbeak Owl, Harrison Jones, Big Game Hunter, Brawl, and Gorehowl are all meta-game calls, but we advise running at least one silence for the foreseeable future.

Mulligan Guide:

Weapons are useful against almost every class, though there are some exceptions we’ll get to later. Armorsmith is typically great against Hunter and Paladin, and is a decent keep most other times as well, though Warlock (both versions) is a notable exception. There’s really not much reason to keep any of your removal or big Legendaries, though Brawl can be kept going second against Zoo.

How to Play:

The standard way to play Control Warrior is to stay alive until you can play your big minions and then start to pressure your opponent. However, if you’re very experienced with the class, you can take a more aggressive approach if you’re able to get board control early on. For an example of good aggressive Control Warrior play, watch Neirea’s games against me in the Kinguin For Charity tournament.

How to Play Versus:

hunterHunter: This matchup was made better for the Warrior with the addition of Shieldmaiden. After using Death’s Bite to clear their minions, you can usually get off a very good Bomb Lobber and shut them down. Mulligan for Fiery War Axe, Armorsmith, and Cruel Taskmaster.


paladinPaladin: GvG has made Paladin very strong, so it’s important to be proficient in this matchup. Recent Paladin decks are much more midrange-focused, so it’s important to stay alive, knowing your late-game minions can win the game for you. On the other hand, Paladins don’t run nearly as much heal, so if you find an opportunity to be aggressive, go for it. Death’s Bite is very important in this matchup, and if you find yourself running into lots of Paladins, then tech-ing in a Whirlwind can help immensely.

druidDruid: This is one of the matchups where Bomb Lobber is extremely valuable. In fact, he’s worth keeping in your opening hand, as Fiery War Axe typically isn’t nearly as valuable against this class. While it’s still a bad matchup, if you ever find yourself against a Druid that started slowly, pressuring his life total can pay dividends down the line as they might have to use their Combo

Card Combinations:

Shield Block and Shield Slam is an obvious combo; the same goes for Taskmaster and Execute. Actually, Taskmaster can be combined with most other minions in Warrior’s arsenal to make them more effective, including using it on an opponent’s minion to enable Big Game Hunter. Bomb Lobber is effective when used after weapons so you can “target” its Battlecry. Finally, Death’s Bite and Taskmaster are your activators for Grommash to finish the game.

Budget Legendary Replacement Guide:

Unfortunately, this deck is built around its late game Legendaries, so there aren’t really any ways to replace them while remaining competitive. As for the one GvG Legendary, Dr. Boom, you can replace him with Baron Geddon and the result is somewhat similar.

demonlock1

Author: Joseph Scalise

Demonlock

Introduction:

Man oh man, what a season it’s been so far. I am finally at rank 1, and the end is near. I can feel it. The deck responsible? A Demonlock variation originally inspired by an old favorite named Koyuki. So, before we move along, what is Demonlock? It, as you can see from the above decklist, a Handlock variation where instead of running Mountain Giants and a few other key cards (such as Ragnaros) you run a set of demons. I have always been a fan of Handlock. However, the Hunter heavy meta has made the deck almost unplayable. Yet, when I saw this list I knew I wanted to give it a try. It gets rid of going for big plays, and allows you a much more streamlined plan. The list may not be the most sound, but it functions very well and has gives me success time and time again on the ladder against the most popular decks. It is not the easiest deck to pilot, but there are some great interactions that I will outline below.

Key Cards:

A lot of the deck is comprised of the usual Handlock cards. While I will not take the time to discuss those, there are a lot of one-ofs (silver bullets if you will) that you need to understand to get a grasp of the entire deck.

poweroverwhelmingPower Overwhelming: Long a combo card, Power Overwhelming has so many uses that it is a great on-of in this list. Yes, there is no Leeroy of Arcane Golem to combo it with, but the card does have a lot of versatility. Most of the time, you are going to be using it for a surprise kill (one of the main ways to win with this deck), but it also has some other uses with deathrattle. Nerubian Egg is obviously very good when used with power, as are Voidcallers when you have a Doom Guard in hand. Another great use for Power Overhwelming is to play on turn seven in combination with Sylvanas. This may seem like card disadvantage, but it is simply a cheaper version of Priest’s Shadow Word Death combo. The last use for this card (and something you should not forget) is this pairs very well with Shadowflame, enabling you to clear some problematic boards.

Zombie_ChowZombie Chow: In a Hunter/Zoo world, if you’re going to try and play a slow Warlock deck you better have early game, and there is no better early game than the chow. Zombie Chow is just a great turn one play that can literally win you games, by keeping you alive for an extra turn or two. That’s how important this card is. The use is really streamlined, and quite obvious, but I want to say do not cut this card from the list. While it is possible to beat both Zoo and Hunter without ever seeing Zombie Chow (or seeing it on turn eight or nine) it just gives you such a powerful tool. It is also very strong against Shaman and Druid, as it can give you ways to help kill of Haunted Creepers and mitigate the first turns while you lifetap.

Nerubian_EggNerubian Egg: Nerubian Egg is a fringe card that I just can’t seem to find any good reason to cut. The reason being that there are many games where this seemingly innocuous zero/two comes in handy for so many different situations. It is great with Power Overwhelming, and can also combo with Void Terror for a very scary turn two/three punch. However, it also can be very annoying when paired with the taunters (Sunfury/Defender) and it even a reasonable answer to AOE. It isn’t the most exciting card, and I will admit there are some games where it does absolutely nothing, but for now I do like it enough to keep in the thirty. If you were to cut the Egg, I would simply just replace it with another Ancient Watcher, as it fills the two drop, can lock out aggro, and is a very good target for Shadowflame.

voidterrorVoid Terror: I don’t want to go out and say this is the best card in the deck (it’s not) but it is very close. It is so good that I am probably going to play two. That may sound a bit odd, but once you start to grind with this deck you will be amazed at the amount of games you want Void Terror. Yes, it does not combo well (at all) with Voidcaller, as having it put into play does nothing. However, eating a Voidcaller to play a Doom Guard can straight out win you the game (that’s a 6/7 and a 5/7 with Charge for three mana if you’re counting). You can also play out Void Terror and eat something like a useless Ancient Watcher just to put a huge threat onto the board. However, the strongest interaction (and the one I always try to save it for) is comboing with Sylvanas. This combo is so powerful, and has won me countless games. If you can use your removal wisely and set up to steal a huge minion the game is usually over. This is because the Void Terror becomes an 8/8 and you also get whatever you stole (usually a Ragnaros, Savannah Highmane or Ysera). A really strong, versatile card that is worth so much more than three mana.

voidcallerVoidcaller: Another card that just seeps potential, Voidcaller has amazed me time and time again. Because of lifetap, you will almost always have a demon in your hand (whether that’s a Doomguard, Void Terror or another Voidcaller) and that makes this card a Harvest Golem on steroids. A three/four trades very well, and cards like Void Terror, Power Overwhelming and Shadowflame all work at getting you free demons. Another bonus of this card is many people will try to avoid killing it if they don’t have a silence, which enables you to either push for damage or pick of smaller minions before going letting it die. This card is one of the most important in the entire deck, and should be always played on turn four if you have another demon in hand.

doomguardDoomguard: I have played countless games with this deck, and in that time I have learned one very important factor, you never want to play Doomguard unless you absolutely have to. That may seem frustrating when you just tap/pass on an empty board on turn five, but almost all of the cards if your deck are very important to winning the end game. Discarding can really set you back, and can outright lose you the game if you lose the wrong cards. Still, this card is so powerful that it is worth being included into the list. If you have lethal or near-lethal then sometimes it’s ok to play Doomguard as a finisher or as a way to apply pressure, but more often than not I will just wait until I can play a Voidcaller. One more note is that, in a pinch Doomguard can also be used as a form of removal to get rid of a problematic minion (I’m looking at you Savannah Highmane).

AlexstraszaAlexstrasza: Perhaps the most controversial card in the list, Alexstrasza is my choice of finisher. When I say this, everyone asks the same question “Why not Jaraxxus?”. Yes, the Eredar Lord of the Burning Legion is a demon, and yes he is very powerful to end the game, but I like the life-bringing dragon more. The reason is, this deck has a lot of burst potential, and that potential just gets better when you can suddenly make your opponents life total fifteen. Jaraxxus and Alexstrasza both heal you to fifteen, but Alexstrasza has the added ability to half the life total against control decks. She is a very powerful tool, and that versatility makes her more useful than the demon lord. Jaraxxus is perhaps better in some very niche situations, but overall in a deck that runs Doomguards and Soulfire you want to have a failsafe, and Alexstrasza serves as that failsafe.

How to Play:

Lifetapping is not important in this deck. I know that sounds weird, but it’s the truth, and something you need to keep in mind. There are no Mountain Giants here, and while you do have Twilight Drakes, you only want to keep them in the control matchups. This is not a deck where you tap/pass every turn until you drop a huge minion. Yes, as with any Warlock you do want to try to draw as many cards as you can, but I will almost never take a lifetap over playing a solid minion onto the board. In the current meta, board presence is one of the most important factors in building a strong deck, and almost every card in this list gives you some kind of board presence be it Zombie Chow or Molten Giant.

The other important aspect of this deck is to always be on the lookout for lethal. I have nearly missed lethal on multiple occasions, because of how intricate this deck is. Soulfire, Power Overwhelming and Doomguard amount to crazy amounts of damage, and can kill people from nowhere. This is very important to keep in mind. During the later turns of the game, I will always count how much damage I have available before I do anything. This is a great habit to get into, and will keep you in the right mindset to win games with burst damage.

How to Mulligan:

Mulliganing in this deck is mostly straightforward. You want to get rid of anything that costs more than three mana, and try to keep your curve low. If you’re playing any control or slow deck (Priest, Warrior, Druid) you want to keep Twlight Drake. However, against aggro, since you will likely be trying to play out minions on the first turns (or using Soulfire) the drake doesn’t do much. Earthen Ring Farseer and Zombie Chow are keeps against any deck, no matter what. I will also keep Nerubian Egg, but usually only if I have a Void Terror or Power Overwhelming to pair it with. Against Control you don’t need to rely on early minions, as you can spend your first turns lifetapping, but doing that against aggro you can’t afford to play that way.

Matchups:

warlockZoo: I know that I normally say that I don’t enjoy decks that have weak matchups against Zoo (and that’s mostly true) but this list is an exception. Zoo is by no means an impossible match, but it is quite difficult. I would say this falls about 40/60 in the favor of Zoo, but that changes if you have Shadowflame or Zombie Chow. You have a lot of tools to fight back, but if they have anti AOE (Nerubian Egg, Haunted Creeper, Harvest Golem) it can become very problematic. The number one rule of Zoo is to never let them have minions on the board. If you do that you can win, just avoid getting overrun.

warlockHandlock: While Zoo is very difficult, Handlock is an easier time. Big Game Hunter and Faceless are both very strong in this matchup. You want to save your removal (and Sylvanas) until you can use it at the best moment, and never let them have Molten Giants. Burst damage is the only way you’re going to win, and you should never forget that. You have the advantage that your deck has more synergy, and they have bigger minions. However, if you can answer their first four drop, you can then mitigate the rest of their minions by sitting back and not attacking. Doomguard/Soulfire should do the rest.

priestControl Priest: Priest is one of the easiest matchups on this list (besides Druid). They have a lot of small, powerful interactions that all build up into a strong, cohesive deck. However, they also have a weakness of not being able to handle multiple strong minions, or ones that drop other minions into play (Voidcaller, Nerubian Egg). You do have to watch out for Cabal Shadow Priest stealing your taunt givers, but if you’re careful about that you should have almost all control over the middle game. Loatheb, Sludge Belcher and Void Caller are all very strong tools that set Priests back. The finisher of choice in this match is Alexstrasza, as doing fifteen damage to a Priest is much easier than doing fifteen.

hunterHunter: I’ve said it before, and I’ll say it again, you cannot play a deck on the ladder if you can’t beat Hunter. I know it seems strange, but this deck can beat Hunter. My win-rate against Rexxar has been off the chain, and that’s the main reason to play this list. Yes, there are games where you will have nothing the first turns, be forced to lifetap, and then die on turn four. However, those are few and far between. For the most part, you usually have some strong openings and then can afford to hide behind your taunts. The best advice for this matchup is to never trigger secrets if they have a bow. You can afford to wait a few turns to draw into Alex or healing while your build your board. Hunters cannot.

shamanShaman: Another matchup that really falls into our favor, Shaman is a class that has too few answers to all of our threats. Earthshock and Hex are really powerful, but you can usually get them to burn them on less threatening targets such as a Void Caller, Void Terror or Nerubian Egg. You really just play your game in this matchup, tapping early and dropping threats in the later turns. The only real thing to be aware of (as always) is their burst potential. If they have a Doomhammer, or if they could have a Doomhammer always try to keep your taunts up and ready. Besides that, your larger minions should take over the game.

warriorControl Warrior: I’m not really sure how this matchup goes. I think Warrior has the advantage due to a surplus of solid, cheap removal, but they also have a hard time dealing with Voidcallers and things like Sludge Belcher. The best move here is try to outlast. Alexstrasza is very strong, but she likely will only bring them down to twenty or so health because of their armor. You’re main vein of winning is through forcing them to use their resources, before using Faceless/Siphon Soul and BGH to take over the end of the game. Always be aware of the removal they have used, and what they have left. If you can keep a minion on the board for a couple turns you should be fine.

druidRamp Druid: The easiest matchup (in my experience) Ramp Druid is a deck that just can’t compete with what you’re doing. Druid has always had trouble dealing with multiple big minions, and you have so many threats they usually can’t keep up. Save Sylvanas for the end of the game, and know that Big Game Hunter doesn’t have too many targets. As such, you can run it out on turn three as a threat (just watch out for Keeper of the Grove). You win this game through a war of attrition. The two things you need to watch out for are the combo (hello taunts) and the Black Knight. As such, be careful about your life total, and always be aware of what exactly you’re giving taunt too.

Budget Replacements:

The only real legendary in this list is Alexstrasza, and as strange as it may seem, the only real replacement is another legendary: Jaraxxus. You need to have one of those two finishers to play this deck, for without them you can have a really tough time against control decks. Which one you choose, however, is up to you. Thanks for reading guys as always. Hope life is good, and, until next time, Happy Thanksgiving!