
Deck Guide: Sea Giant Hunter
Author: Joseph Scalise
1. Introduction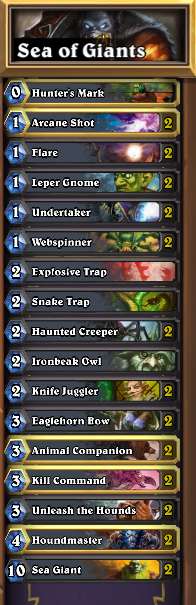
In this weeks deck tech I want to answer some very interesting questions. How exactly do you target a meta? What’s wrong with Hunters? How do you put a fresh spin on something that’s been done over and over? And, most importantly, is Unleash the Hounds too good? In order to answer such questions, this week we are going to the darkside and taking a look at a very interesting Hunter deck from a good friend of mine, Holyrock (creator of the once powerful Shockadin deck). This deck is a Hunter aggro deck that works with a little bit of an interesting twist. The changes to the deck don’t seem like a huge change, but they target the metagame really, really well.
When you use any class in Hearthstone, there are certain things that are inescapable. You are going to use key class cards, and probably the neutral cards that best fit that class. Most decks are going to make use of Sludge Belcher, Shaman is going to have Lightning Storm and Warlocks are going to try to kill you with either Molten Giants or Flame Imps. Those are just facts of playing this wonderful game. However, what makes a deck unique are certain cards that deviate from the norm and give you an extra advantage. Such is the case with this week’s deck. Holyrock’s deck takes the classic Hunter aggro deck, and while it really doesn’t change all that much, it does manage to add a few cards that make it very powerful and an all-star choice for climbing the ladder.
2. Key Cards
Most of this deck is comprised of the classic Hunter cards, and those don’t really need an explanation. However, when you are targeting a metagame, in this case Warlock and other Hunter decks, you want to find the silver bullets that will push games rapidly into your favor. When Argent Squire was all the rage Blood Knight was good, when Ramp Druid was around The Black Knight was an all-star, etc. This deck takes that mentality, and uses certain tools to make aggro matchups a breeze without sacrificing the Hunter core that makes the class so overpowered good.
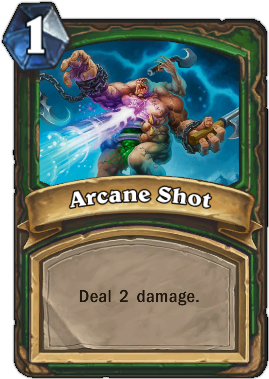 Arcane Shot
The first card I want to discuss is Arcane Shot, a long forgotten Hunter card that is a relic of times far past. I think I have said this in every deck so far, but you cannot stand tall in this meta without a way to fight against Undertaker. The card is an insane card that has found its way into just about every deck you’ll encounter. Arcane Shot is a great, cheap way to kill a turn one Undertaker instead of just playing a minion and praying they don’t have deathrattle (spoiler: they always have deathrattle). This card also has great utility against a lot of small creatures, and can be used to finish off three health minions with the help of a creeper or Webspinner.
Arcane Shot is a compete reaction to the current ladder trend, but it is essential. I know it seem innocuous, but this card has done me so much good it’s hard not to see how strong it is. Hunters are strong because they can operate on small amounts of mana and through tight windows. This card allows you to do just that (Animal Companion and kill a minion on turn four for instance) while also serving as both an early turn answer and a way to get lethal in a pinch.
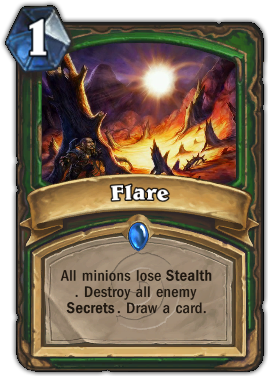 Flare
Flare
I bring up Flare because this card is more of a choice than a necessity. In a deck like this, where there are certain cards you want at certain times, Tracking seems like it would be really good. Holyrock and I have discussed this, but for now we are keeping Flare due to the presence of Hunter and occasional Mage deck. I think Tracking would strengthen this deck even more, but for now Flare sits in the spot. If you aren’t seeing a ton of Hunter or simply want a more reliable way to set up combos I would suggest trading these for two Tracking. It’s really your call.
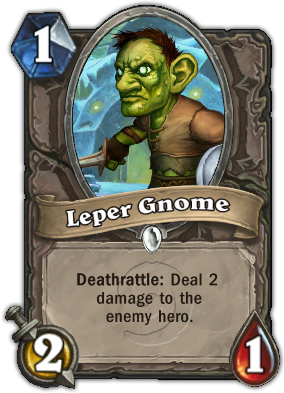 Leper Gnome
While everyone knows how good Leper Gnome is, I bring this card up as a reminder. A reminder that you are an aggro deck. This deck can be slow at times, and you might forget your number one priority is to kill your opponent. You start making trades and looking for efficient ways to set up lethal for later turns. Don’t. As with any Hunter deck, there is a huge amount of potential for damage, and this card is a good way to keep that in mind. Only aggro decks play the Gnome, and no matter how slow your start is, never forget to use your hero power and throw spells at your opponent’s face.
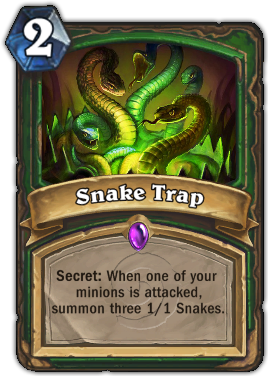 Snake Trap
In order to make this deck more streamlined there are only two traps and no Mad Scientists. This might seem strange, but the Snake Traps aren’t really a necessity, and the bow doesn’t need them to be good. Snake Trap is here to make Knife Juggler and Houndmaster better while also adding more damage and board presence. This card can win certain matchups on it’s own, and will run aggressive decks like Zoo into the ground. It also makes Sea Giant better, and can trigger a very early eight/eight. It’s a utility card, and isn’t much more than that. As such, instead of trying to force ways to bring it into play you just play it when you can, and if you don’t draw it, it’s not the end of the world.
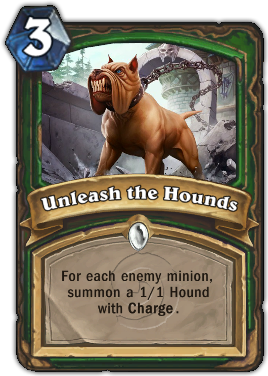 Unleash the Hounds
I promised to answer a question earlier, is Unleash the Hounds too good? I think the answer is most definitely, yes. Yes a thousand times, and this deck is just another reason. With Hunter, Warlock and Shaman so prevalent on ladder, this card can just massively swing games. The combo potential with Knife Juggler is very powerful, and while you’re not drawing cards that play usually either eats your opponent’s board or pours on a large amount of damage. This is a very tough card to play around, and a lot of the time I find my opponent’s forgetting that it exists. In addition, the hounds are also great with Sea Giant, usually making the giant eight/eight cost two, one or zero mana. One of the best plays in this deck is to play the hounds, then drop a giant and clear your opponent’s board. Add on that the hounds trigger Kill Command and you just really have one of the best cards in the game.
 Eaglehorn Bow
I bring up the bow because you only have two secrets in this deck. That’s important because you need to see the bow for what it is, six damage for three mana. It’s another version of Kill Command that gets your opponent from living to dead rather quickly. Obviously, if you have a trap then wait for it to get triggered before you use the second half of the bow, but I find that most of the time it is right to just bash away. Don’t wait for your secrets to be drawn. Also, it should be noted that using the bow to clear is also a good move if it protects your small, early game minions.
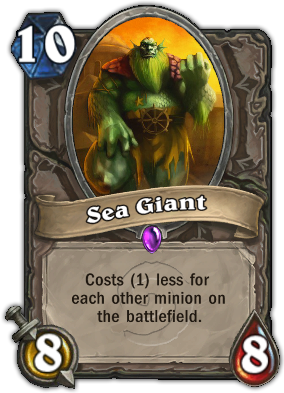 Sea Giant
“You will be fast. You will be powerful, and you take this world by storm. It will be because you are immense, because you have what no one else does and, above all else it will be because nobody is going to see you coming”. That quote perfectly describes why Sea Giant is so strong. Yes, there are decks that can answer this card, and yes there are ways to nullify the eight/eight, but nobody ever expects it. That’s important because in a deck that can do massive amounts of damage out of nowhere if your opponent can’t answer the giant the game is just over. Minions are all the rage right now in Hearthstone, and this card plays off of that. Obviously it is great with Snake Trap and the hounds, but even without those cards you can usually play Sea Giant on turn five or six, which is just straight value.
3. How to Play
Be aggressive. That is a very important part of this deck that I keep reiterating simply because I feel that it is very easy to forget you are a Hunter when playing this deck. Yes, there are some games where you will open with Undertaker into deathrattle and just run away with it, but there will be many where you will have a turn two Haunted Creeper into a turn three Snake Trap. However, no matter your opening your main goal is to hit your opponents face as fast as you can and make sure they go from thirty to zero before you do. Don’t forget about your hero power and use it as often as you can. Hold back Kill Commands for the face and don’t be afraid to swing through as much damage as you can before your opponent can start dropping taunts.
Something else to keep in mind is that when playing a deck like this, one that has little to no card advantage, you always want to be playing to your outs. What that means is you want to be aware of the cards you could always draw at any given time. This goes for any situation, whether you are trying to just stabilize board or push through for damage. If you are under pressure and might die in a turn or two should you throw your Kill Command at your opponent’s face while you have open mana? What could you draw for lethal? How can you push through? This type of thinking is essential in this deck. Know the cards you always having coming, and be aware of damage potential. This will help you decide how reckless to be.
4. How to Mulligan
Mulliganing with this deck differs between going up against aggro and control decks. For quick reference, control classes are Priest, Druid, Warrior and Paladin while aggro is Warlock and Hunter. This might not always be the case, but stick to that list for choosing how to mulligan. For the control game you just want to increase your damage output as fast as possible. Sea Giant is a lot worse in those matchups because a lot of decks have quick ways to deal with the eight/eight such as Hex, Shadow Word Death and Execute. However, you still have many ways to do massive amounts of damage very quickly, and those should be utilized. When going up against control I will always throw back any card that costs three or more mana and try to find a solid curve of one drop into a good two and three. Kill Commands are usually going to be the way you win games here, so I try to avoid using them on creatures when I can. I will also never throw back an Ironbeak Owl against control decks.
On the flip side of the above mulligan, the aggro matchup is quite different. Arcane Shot is in this deck to kill Undertakers, and that’s exactly why you should never get rid of it when going up against Zoo or Hunter (there’s even some merit to holding it against Priest). While you want to start early, I will also keep both Unleash the Hounds and Ironbeak Owl. The owl may seem strange, but being able to shut down Haunted Creeper and Nerubian Egg makes it very valuable. You want to be able to control the first turns as much as you can. Knife Juggler is also a very strong card that I will keep here, especially if I have a Snake Trap or Haunted Creeper.
5. Matchups
 Zoo
Zoo
Zoo, which at this point seems like it will never die, is a great reason to play this deck. You have the advantage at almost every step of the way here, and can run away with most games. They can snowball faster than you, which can lead to losses, but so far I only have one loss against Zoo. Undertaker and Arcane Shot are both great in the early game as are Knife Juggler and Haunted Creeper. Snake Trap is a nightmare for an aggro deck dependent on board clear, and Sea Giants usually cost next to nothing. Unleash the Hounds, as it has always been, is the strongest card you have against Zoo, and it almost always acts as a board clear. Harvest Golem is their best card against, but for the most part you are always in control.
 Hunter
Strange as it might seem, this is also a very easy matchup. While traditional Hunter decks are doing what you are, the inclusion of Knife Juggler, Arcane Shot and Sea Giant really give you more options. Unleash the Hounds is also very good here as Hunters tend to have a lot of minions floating around. They also have unleash, so be aware of that. Houndmaster and Animal Companion are the two cards that really swing this match. If you have coin and a one drop I will always keep Companion here. Don’t forget to always clear beasts when you can to make sure they can’t take advantage of their Houndmaster or Kill Commands. Ironbeak Owl is really strong here, turning off just about ever problem card they have.
Handlock
Hunter beats Handlock, and this time it’s no different. Everything they do falls right into our gameplan, and the hero power/Kill Command always acts as an excellent finisher. Never mulligan away Hunter’s Mark of Ironbeak Owl in this matchup as both give you ways to kill their giant turn four play. The most important thing to remember about Handlock is to push through as much damage as you can before dropping them below ten. Never be afraid to hit the face here as you have access to so much direct damage you will almost always be able to kill them before they can really mount any board presence.
 Priest (Deathrattle)
Priest is probably one of the hardest matchups due to their ability to counter almost all early turn plays. However, because of our hero power, they can’t really climb back into the game if they stumble early. Auchenai/circle doesn’t do nearly enough to bring them back. They can kill off giants pretty easily with Shadow Word, but it is always worth running out the eight/eight and daring them to have it. This game is usually won in the first few turns, seeing if their first assault can top ours. Northshire Cleric is a very annoying card that can trade with both Webspinner and Leper Gnome, and Zombie Chow is even worse. However, Animal Companion can give Priests headaches and give you some extra punch to push into the mid-game.
 Shaman
Shaman is a very interesting matchup. The reason is that sometimes you can just get obliterated with everything you play getting answered in a flurry of Lighting Bolts, Earthshocks and Hexes. However, for the most part I feel like I’m preying on this class. Unleash the Hounds has always been insanely powerful, and with the lack of healing all damage sticks. That’s very important because it makes it very easy to calculate lethal for the coming turns. Shaman is a favorable matchup where sometimes you get crushed. The most important cards to be aware of are Feral Spirit and Defender of Argus. Both can be very tricky to maneuver around. The best way to deal with this is to clear out their minions as much as possible. Shamans operate very poorly with an empty board, and that’s the general rule of thumb when it comes to this match.
 Mage
Mage
There are a couple versions of Mage floating around, and they all are very weak to Flare. I would mulligan exclusively for that card. Also, know that Mages have very few early game answers that really don’t go beyond Frost Bolt and Mana Wyrm. As such, you want to punch them hard and fast. If they lack early removal they can’t keep up with Undertaker, which makes it the most important card here. You want to force them to use their burn on your minions instead of your face, and almost every card in their deck forces them to do just that. This is the one match where you just want to run out your minions and see if they can answer them. Also, like Shaman they have no healing, which means when you do damage they can’t recover.
 Control Warrior
I finish with the hardest matchup. Control Warrior has always gives aggro decks problems, and this time it is no different. I am currently 3-3 against the armored menace, and each game came down to the two or four life. While they have things like Shield Block and Sludge Belcher the two most important cards in the match are Armorsmith and an early Fiery War Axe. War Axe is really the only way they can deal with a turn one Undertaker, and Armorsmith trades with Leper Gnome and Webspinner while also gaining the Warrior health. However, that being said every game usually comes down to the wire. This is because you still have your hero power and Kill Command, both of which can really put a dent in their armor. The strongest tool we have is Animal Companion, which can really halt their plans. Never mulligan that card away if you have the coin. Overall, if they get the right cards the match is very, very hard, but if they do stumble for a turn or two you can really take advantage by taking over the board and then making them pay. Always kill (or owl) Armorsmiths, make them use their weapons (which just amounts to extra damage) and hope they don’t have an answer for the companion.
Well, that’s it for this weeks deck tech. Hope you guys enjoyed it, thanks for reading and, as always, may your Undertakers live to see turn two.
SIMILAR ARTICLES


You must be logged in to reply to this topic.