
Deck Guide: Combo Warrior
Author: Joseph Scalise
The other day on Reddit, Razor put up a Warrior/Enrage/Warsong Commander deck that he hit legend with last season. I have always loved Warrior, and thought that the deck looked interesting and competitive enough to give it a shot. Unfortunately, my first results with the deck weren’t that good. In fact, they weren’t good at all. The deck seemed to have some powerful draws (as most combo decks often do) but it also fizzled way too much for my liking. Instead of acting as a midrange powerhouse it seemed like a deck that wanted to scale into big threats, which Control Warrior already does better. However, after some testing I knew that something was there. As such, I began to sit down and deconstruct the deck. I wanted to find out what worked when it won, what didn’t when it lost, and why I would win games. As I began to play around something became very apparent, the deck had the potential to both combo out of nowhere and to take over games through card advantage. Cards like Acolyte of Pain, Gnomish Inventor and Battle Rage (yes Battle Rage) all allowed the deck so much card draw that it was almost impossible to run out of steam. I went through a bunch of choices before settling on my final list, which has been doing extremely well for me in the early days of this new season.
First off, I want to start by saying that yes, my final list is only a three card deviation off of the original (two Cruel Taskmaster and one Raging Worgen), but the three card change has made a world of difference. I climbed nine ranks in a day after the changes and am very confident this build could take me all the way to legend. This deck succeeds because it works on two different levels. Most of the time it plays very similar to Control Warrior, and other times it plays like an aggressive, face blasting machine. What the means is that the deck is a burst down deck that uses a lot of good synergies and strong cards to get to
the end game. Think of this list as very similar to Miracle Rogue, except instead of Auctioneer you have Warsong Commander and instead of Backstab, Shiv and SI:7 Agent to control the early game you have weapons, Unstable Ghoul and Cruel Taskmaster. Now, instead of playing slow nonsense cards like Ragnaros and Grommash, it’s more streamlined and focused. I know on paper this deck looks like one of the sketchiest things ever patched together, but trust me when I say not only is this deck good, but it truly is primed to take on every deck in the meta.
![]()
2. Key Cards
While many of the cards in this deck speak for themselves (such as Fiery War Axe and Sludge Belcher) the build is so peculiar that there are many choices that need further explanation. Those odd choices will be laid out below.
There was no card on the list that I was more skeptical of than Inner Rage. Maybe, maybe in aggro this card is passable, but the card disadvantage in a midrange deck seems laughable. However, like so many other parts of this deck, the card is really good. I’m not sure how strong this card would be in the original list without Raging Worgen, but with the Worgen the combo potential is too strong to ignore. Not only that, but in games where you want to be the aggressor this card is also very strong with Amani Berserker and Frothing Berserker. However, you should always mulligan this card away, as its main function it to be a combo enabler for the later turns. It is also great removal, stacking with Ghoul/Death’s Bite and Execute to decimate your opponent’s board. Against some classes (namely Hunter and Priest) I will keep it in my opener if I also have an Acolyte of Pain, but that’s the only situation.
A card that seems like an odd fit, Execute is exactly what the doctor ordered for this type of list. It doesn’t seem like it, but this deck draws a lot of cards. As such, while Execute usually only fits into Control builds due to the inherent card disadvantage, that is very minimal here. This really is your best answer to any large creatures, and should be saved in matchups like Zoo or Shaman where you want to wait for threats like Doomguard or Sea Giant/Fire Elemental. You have a lot of removal in this deck between minions and weapons, but Execute if your ace in the whole. You have many ways to clear out small creatures, but really only two cards that take out the fatties. Always mulligan these away in the early game, but be happy when you draw into them later.
Out of every single card in this list, I don’t think there are any more puzzling than Battle Rage. Yes, it can do nothing and yes, this card seems very gimmicky, but it has won me enough games for me to know it’s merit. In a lot of ways this card is just like Divine Favor, a draw spell that can swing the game if you set it up properly. Just playing out your turns and not thinking ahead or setting up a large Battle Rage can be the difference between winning and losing. In aggro Paladin I would often play cards suboptimally in order to draw card off of Divine Favor. Here that also applies with Battle Rage. Many times I will give up extra damage or use a Death’s Bite trigger early as a way to draw as many cards as possible off of Battle Rage.
Now, that is not to say you should force it either. Some games you will only draw one or two cards off of this card, and that’s ok. While two may seem really weak, if a card said “2 mana:draw two” it would be played in many decks. Since Battle Rage also triggers off of you, you are always going to at least draw one card. The ability to draw more (my current record is six) makes it a very necessary part to this deck. You want your minions to take damage in this deck, and a card that rewards you for that is a staple. Always mulligan this card away, you want to spend the early games controlling the board, not drawing cards.
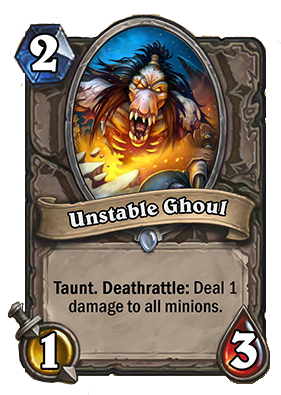 Unstable Ghoul
For the first turns of the game you are a Control Warrior. I will go into more detail about this below in the “How to Play” section, but that’s something you don’t ever want to forget. Unstable Ghoul pulls overtime in this deck, helping you control the board while also triggering almost every minion in the deck. Just like Death’s Bite this card is a free Whirlwind, which you should always try to hid minion’s behind. Amani/Frothing Berserker, Acolyte of Pain and Raging Worgen all can give your opponent’s nightmares when the Ghoul is on the board with them. This card also triggers Execute and can be used in conjunction with your weapons to clear higher toughness creatures (Death Cultist meet Fiery War Axe). It also is a great combo enabler, and I have won many games going Warsong into Ghoul/Frothing. This is a card you always want to see in your opening hand and I only mulligan it away against Priest, Warsong/Any minion with 3 or less attack.
While there are many truths I have learned in my twenty three years of life, one of those truths is this: this deck would not work without Warsong Commander. The card is just too strong and does too much. While you will win some games with a weapon or triggering a huge Frothing Berserker, almost every game will be won on the back of this card. There are only two minions (The Black Knight and Kor’kron Elite) that don’t get charge off of this card, and Kor’kron already has charge. Setting up the combo is one of the most important parts of this deck, and should always be on your mind. I never keep combo pieces with this deck, and so I will always mulligan Warsong away. However, keep in mind that there are two in the deck. That means you can use a commander in the earlier turns of the game to set up a value play, and then depend on the second one for a finisher later on.
Raging Worgen
While this deck is very strong, I cannot for the life of my understand why Worgen was not in the original list. Raging Worgen and Warsong Commander go together as well as any combo in the game and that’s extremely apparent here. So why only run one? Well, truthfully I tried to cut both Gnomish Inventors (the only card that really can be cut in this list) and I found that I wanted one as a way to smooth out bad draws. Since all of the other synergy was too strong, I decided to only put one Worgen in. However, the amount of card draw means you will usually encounter the werewolf at some point. I won five games on the back of Worgen alone last night, and I would not play this deck without at least one. The only problem with Worgen is that, unlike all of the other cards, it really can’t be played on the board without the combo. People will do anything they can to kill this card, which makes it only really useful when played with Warsong. Sometimes I will hide this behind a ghoul, but that only happens when I know my opponent has no form of removal or I’m already way ahead.
One of my favorite reasons for playing this deck is the inclusion of Death’s Bite. When this card first got spoiled I was excited for a new enrage deck to be born. Until this deck, no one has really used this card to its full potential. Being able to activate Berserkers and Worgen for free is an incredible way to set up your final combo. You should always try to save the final swing (and the subsequent Whirlwind) for the right moment. I have waited turns and turns before popping this axe, and that’s not a bad move. Sometimes you will just use both hits right away, and that’s fine too. Just be aware of how you can use this card to combo before you run out of uses. This is a deck built off of combos, and the fact that this card doubles as removal as well as a combo enabler makes it incredibly powerful.
 Loatheb
Another odd card choice, Loatheb is yet another reminder that this deck is first and foremost a midrange deck. By now everybody is aware of how strong Loatheb is, but he may seem odd in this deck. Where this deck used to have Ragnaros and Grommash as the end game, it now relies on Loatheb and The Black Knight. Loatheb is just a solid card that lets you set up lethal two turns in advance. While sometimes you can play Loatheb on turn five for board control, I mainly use him as a way to survive an extra turn (usually turn seven) so I can combo on turn eight. Many decks in the meta have a hard time killing you without having access to spells, and that’s what you depend on Loatheb for. Shutting down Bloodlust, Kill Commands, Savage Roar and the like can buy you the one turn you need to draw your own lethal.
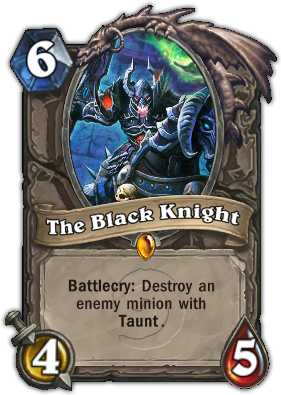 The Black Knight
Sludge Belcher. I can’t say that enough. The taunting five drop is everywhere, making The Black Knight one of the best utility cards you can run these days. Having the ability to remove taunts in this deck is key, since your combo is also dependent on using minions, but this card is mainly a tempo play more than anything else. Just like Unstable Ghoul and Cruel Taskmaster, The Black Knight helps you control the board while also doubling as a way to enable the combo. You can’t ask more from a card than that.
![]()
3. How to Mulligan
Going first or going second the gameplan is always the same; control the board. As stated earlier, this deck is a burst down deck. The way you execute that plan is to mulligan for an early game and hope your midrange game can take over to get you to the end. Some games you will be able to play the aggressor, and some games you will just spend your first time clearing creatures, but either way you want to exclusively try and find things to play on the first turns. While normally I would go over the choices in more detail based on matchups, I will include a simple list here since the mulligan strategy is almost the same for every deck. I will always mulligan away any combo piece, which includes Battle Rage, Warsong Commander, Inner Rage and even Raging Worgen. You want to always try for two drops and none of those cards help you. I will always keep Fiery War Axe, Unstable Ghoul, Amani Berserker and Cruel Taskmaster. Those three cards are key to starting strong, and I will usually even mulligan away three drops to try and find them. That strategy goes for every matchup. Also, always be sure to mulligan away any card that costs more than three. Execute is a card I also will not keep against anything except Druid
![]()
4. How to Play
This deck plays a lot like Zoo. How does that make any sense? Well, any good Zoo player will tell you that you want to control the board as much as possible before swinging away at your opponent’s face. The same thing is true here. I cannot stress how important board control is with this deck. Unless you have the combo in hand, or you are pushing for lethal, I would always choose to clear my opponent’s minions rather than going for damage. This is because, with the combo in your deck, you are always going to be able to burst them down before they can finish you. Your weapons also work as added pressure, and can help end the game in a hurry if need be.
The early game control of this deck makes it much more like Control Warrior, except instead of a flurry of big legends you have Warsong Commander and her crew. If you use your removal in the right way, and get to the point where you can start growing your Frothing Berserkers and Sludge Belchers you will always have the advantage. Utilize your Acolytes of Pain to their full extent and set up your Battle Rages to make sure you never run out of things to play. Staying on curve is key, and be aware that since your opponent will always assume you’re playing Control Warrior, they will never see the combo coming. Use that to your advantage.
![]()
5. Matchups
 Zoo
Zoo
I know this sounds strange, but this deck is almost tailor-made to beat Zoo. I am currently 12-1 against Zoo and the only matchup I lost came at a Doomguard/Lifetap/Soulfire nonsense play. In this matchup you are one hundred percent the control player. Do whatever it takes to keep those annoying minions off the board and know that your hero power will take over the late game if you make it that far. Zoo is only strong if they have minions on the board. If you use everything you can to make sure they don’t have minions you will be fine. Execute is strong here for both Nerubians and Doomguards, but I’m still not sure if it’s worth keeping in your opening hand. This matchup falls in your favor due to the fact that you have enough early cards to completely take Zoo off of their early game plan and your midrange plays are much stronger than theirs.
Handlock
Another breeze of a matchup, Handlock plays straight into our hands. Unlike most aggro decks we don’t have to do a lot of damage to be able to win. As such, the goal here is to
sit back and pick away at their board while applying enough pressure to threaten their life total. You will almost always win this matchup through the combo since keeping them around sixteen health takes away their ability to play free giants. Execute and The Black Knight are great here, but since you have to assume all Warlocks are Zoo (to not get run over) you can’t afford to keep either. As soon as you know they are Handlock pressure their life and start getting things onto the board.
 Deathrattle Priest
At first glance it may seem like Priest would be a hard matchup. However, while it is by no means easy, I would say that this falls somewhere around the fifty percent mark (maybe even 60/40 in our favor). Their early game is a lot better than ours, but we also have a lot of ways to deal with their threats. Death Cultist dies to an early drop/enrage trigger while their one drops can’t handle Fiery War Axe. If they get ahead and start comboing off with Circle of Healing it’s really hard to come back, but if you can stop their first plays, or if they don’t have any first plays and concede board, then you should be in the driver seat the whole game. As always, be cognizant of Auchenia/Circle and watch out for Cabal Shadow Priest. I will never play Acolyte in this matchup unless I can trigger it immediately or it’s on one of the earlier turns.
 Hunter
Despite Blizzard’s best efforts, Hunter is still more than alive and well on the ladder. This class just won’t go away and still has the potential to beat you over the head. Here, you are absolutely the Control player in the early game, just trying to do what it takes to stay alive. Always be aware of the damage they could have (Bow, Kill Command, Hero Power) and don’t be afraid to use your hero power. This deck ignores the Warrior hero power in most games (unless there’s nothing else to do) but here it is essential. Your early removal usually trumps their early plays, and the only real problem card is Savannah Highmane. However, unlike Zoo you can’t deplete them of resources due to their hero power. As such, on turn six or so I will turn into the aggressor and try to push for damage as much as possible. The point of this matchup is to trip them up early so you can finish the race just a little stronger than they can. If you can clear do it, but know that they will eventually draw into enough damage.
 Control Warrior
One of the two matchups where you can afford to really be the aggressor (Handlock being the other) you need to hit Control Warrior in the mouth and hit them hard. Control Warrior’s ability to heal (or armor) is moreso than any other deck, which makes this a very tricky game. You need to get their life total down to where they spend their turn armoring up instead of trying to fight for control of the board. The biggest trick of this matchup is to always clear their Acolytes and Armorsmiths since every card in your deck triggers both of them.
Another big part of this game is the card battle. If you can draw two or more off of your Acolytes you have another big advantage. Be aware of their removal and only play Acolytes when you can trigger them. Also, since they also play so many Whirlwind effects, Battle Rage is very strong (though still not worthy of a first hand keep). The climb isn’t easy, but if you get going early you give yourself a good chance at winning. More often than not you are going to be depending on the combo in this one to overcome their inherent armor gain.
 Ramp Druid
The second hardest matchup you will encounter, Ramp Druid is a tough one to get through. Their ramping ability can just end the game on the first couple of turns, and you their endless waves of taunts make comboing very hard. It’s so bad that I have almost been tempted to keep The Black Knight (though I never have). Never mulligan away Execute here. That’s a rule that you should stick by as Execute can help you stop huge threats (which they have) and will also help you stop any early turn Innervate nightmares. Just like Control Warrior the focus on this game is card advantage and combo. Early threats aren’t bad, and you can be the aggressor if they have a slow start, but for the most part keeping their huge threats at bay is the way you want to play this game. Acolyte of Pain and Frothing Berserker are both key in this matchup. Acolyte can be very tricky for Druid to deal with and Frothing demands a Swipe. If they can’t deal with either card immediately you are usually in pretty good shape.
 Sea Giant Shaman
Shaman is the hardest matchup due to the fact that they do exactly what we do, control the board at all costs, but have access to things like Flametongue Totem, Feral Spirit and Lightning Storm to make their time of it easier. Know how much damage this deck can do and always be aware of how to set up lethal. As strong as Shaman can be, they have no way to heal, which makes all the damage you do matter. Execute is key here as it is really the only answer for both Sea Giant and Fire Elemental. Zombie Chow and Haunted Creeper backed up by Lightning Bolt and Earthshock can ruin our day. Also, this is another matchup where you should never play a naked Acolyte due to the number of ways they can deal with it in one hit. Being aggressive here isn’t necessary, make them use their Lightning Storms are inopportune times, and always watch out for Feral Spirits.
![]()
6. Budget Replacements (and an Inclusion)
Every time someone asks me for a good replacement for The Black Knight I almost always say Ironbeak Owl. Both cards remove taunt (which is really what you need) and the bird also has the bonus of shutting down other cards. However, here I would say there really isn’t a great replacement for The Black Knight. The tempo swing you get from it is usually too strong to sacrifice, and it helps you in problem matchups like Druid. If you absolutely needed to I would replace the knight with Spellbreaker (just because it’s a better midrange option) but even that seems weak. Loatheb is a card almost everyone has access to by now so it’s not really worth talking about. However, I do want to talk about a Legend in the form of Grommash.
I do not like Grommash in this deck. Yes, he’s a finisher, and yes, he can be very strong, but overall paying that much for an enabler that does less than Warsong and crew just is not worth it. This is a midrange list and Grommash serves a completely different purpose. My biggest problem with Razor’s list was that it didn’t seemed focused enough. Grommash was part of this problem, and cutting him I think brings the curve down and tightens everything up. If you absolutely want him in the build I would cut the Worgen. Well that’s the deck, hope you enjoyed it as it’s both strong and fun to play. Until next week, may you always draw three of of Acolyte of Pain.
SIMILAR ARTICLES


You must be logged in to reply to this topic.